
With over a billion pieces of their furniture in homes globally, it’s safe to say a huge number of those items will eventually need to be moved. This creates a very common DIY situation for countless people.
Your sturdy sleeping structure has served you well, but now it’s time for a change. Whether you’re relocating or simply redesigning your room, taking this large piece apart is a necessary step.
This guide is designed to walk you through that process smoothly. We provide clear, step-by-step instructions to ensure your furniture stays in perfect shape. The goal is to avoid any damage during the move.
We’ll look at the specific way this Swedish retailer’s products are assembled. Understanding the locking mechanics is the key to a stress-free dismantling. With the right approach, you can sidestep the headaches others have faced.
By following professional advice, you protect your investment and make the next setup much easier. Let’s get you prepared for a successful project.
Key Takeaways
- Proper preparation is the most important step for a smooth dismantling process.
- Having the correct tools on hand before you start saves time and prevents damage.
- Understanding the specific fastener types used in this furniture is crucial.
- Working methodically helps you keep all parts organized for reassembly.
- Protecting your floor and the furniture components prevents scratches and dents.
- Patience is your best friend when dealing with any stuck or tight fittings.
- Labeling parts or taking photos during the process is a highly recommended pro tip.
Understanding the IKEA Bed Frame Design
A signature element of this brand’s design is the cam-lock system. It securely fastens the metal posts to the main structure.
These connectors typically require only a quarter turn to release their hold. As noted by a user in 2020, this simple rotation is often all that’s needed. Recognizing how the arrow on the cam points toward the post helps identify the unlocked position.
Understanding the internal build is essential. It prevents damage to the chipboard or connecting hardware. Many models, like the Nordli, use consistent connection points across the entire piece.
This knowledge is your first defense against frustration. It ensures you approach the task with confidence and care for your furniture.
Gathering Tools and Materials
The right equipment transforms a potentially frustrating chore into a straightforward task. Proper preparation with the correct tools saves time and prevents damage. This is especially true when taking apart your bed for a move.
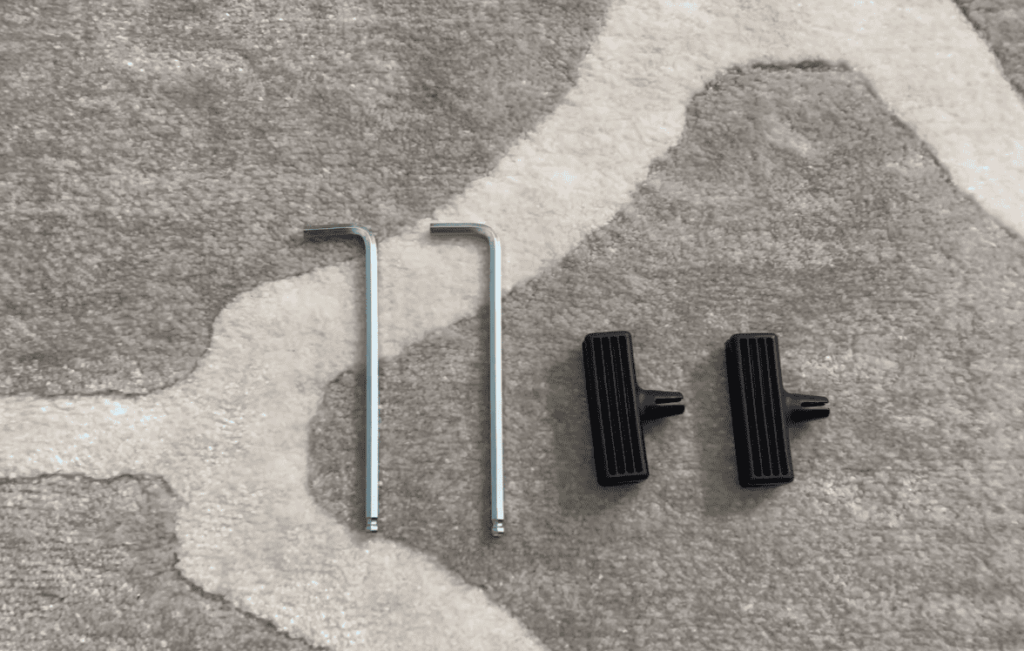
As cobaltnine suggested on May 29, 2020, the specific size of allen wrench is critical for cam-lock connectors. Checking your toolbox for this item is a smart first move.
Essential Tools and Screwdrivers
A basic set often includes the necessary allen wrenches. Many find the ones in a standard red holder kit sufficient.
Ensure your implements are clean and in good shape. This prevents stripping screw heads during the process. A Phillips-head screwdriver may also be needed.
Optional Supplies and Home Depot Alternatives
If your current toolkit is lacking, a store like Home Depot offers the correct equipment. Optional items include work gloves for grip.
Labels for part organization can enhance efficiency. These extras make the job safer and more organized.
Step-by-Step: how to disassemble ikea bed frame
A step-by-step methodology ensures the large components come apart without force or damage. This logical sequence protects your furniture and makes the job manageable.
Following a clear plan is the best way to take apart your sleeping structure. It turns a big project into a series of simple actions.
Preparing the Frame for Disassembly
Begin by creating a safe, open workspace. Remove all bedding and clear the floor around the bed.
Have your tools ready and within arm’s reach. This includes the correct allen wrench and a flathead screwdriver for prying. A clean, soft blanket on the floor prevents scratches.
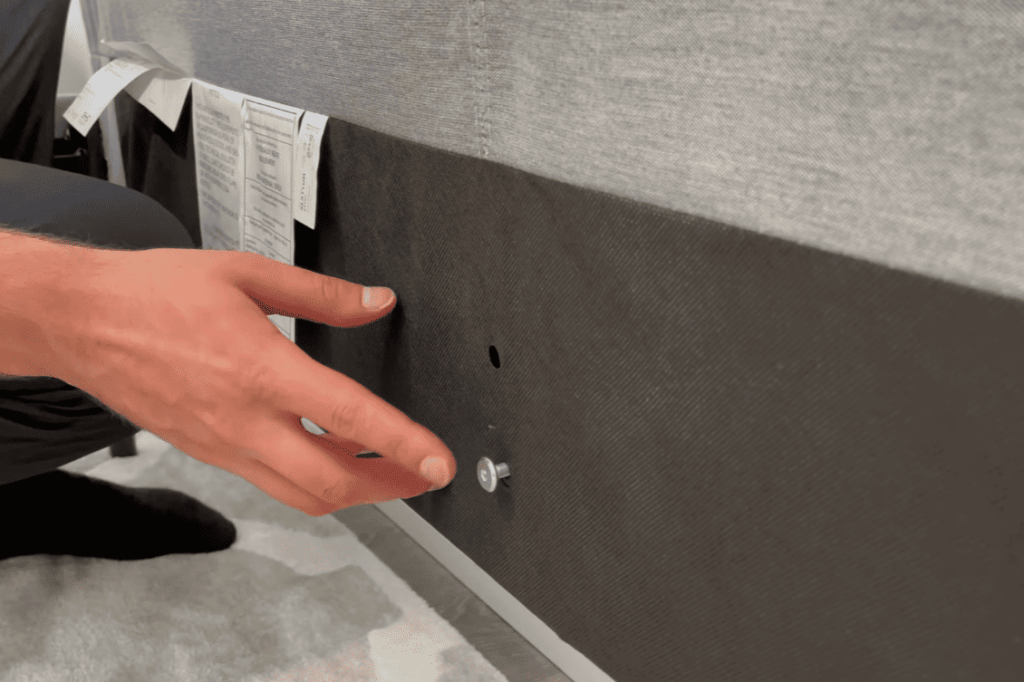
Unscrewing and Releasing Connectors
Locate the cam-lock connectors where the metal posts meet the main frame. As JoeZydeco confirmed, the arrow on the cam must point toward the post when unlocked.
Insert your allen wrench and turn the screw slowly. Dip Flash noted that a quarter-turn is often enough to release the hold.
After turning, the pieces may still be snug. Nkknkk advised gently prying them apart with a flat tool. Work on one connector at a time to keep the structure stable.

| Step | Action | Pro Tip |
|---|---|---|
| 1. Verify Position | Check the cam arrow points at the metal post. | This visual check confirms the connector is ready to release. |
| 2. Apply Turn | Use the allen wrench for a precise quarter-turn. | Do not over-tighten or force it; a small rotation works. |
| 3. Separate Parts | Gently pry the components apart if they stick. | Use a flathead screwdriver with care to avoid damaging the wood. |
Move methodically around the entire structure. This prevents any sudden shifts or collapses as you work.
Tips for Dealing with Stuck Screws
Stuck fasteners in your bed are a common hurdle. Forcing them can cause damage. Smart techniques free them safely.
Using the Right Allen Wrench
The correct tool size is critical. An ill-fitting wrench strips the screw head. This makes removal nearly impossible.
Always verify the hex key matches perfectly. A slight mismatch risks ruining the hardware.
Adjusting Frame Tension
Structural tension often binds components. Ensuring the structure is square and level relieves pressure.
Adjusting the frame to be square and level can relieve tension on stuck screws.
Try lifting each corner slightly. This simple action provides needed relief without force.
| Problem | Solution | Outcome |
|---|---|---|
| Stripped screw head | Use exact allen wrench size | Prevents further damage |
| Bound cam-lock | Square and level the frame | Reduces internal pressure |
| Stubborn turn | Lift corner gently | Allows screw to rotate freely |
Precautions and Safety Measures
A few simple precautions can make the difference between a smooth project and a costly mistake. Your well-being and your home’s condition are paramount. Always think ahead before applying any force.
As Protorp noted in 2020, excessive pressure can harm your flooring. A hardwood surface is especially vulnerable to scratches and dents.
Using excessive force can damage hardwood floors if not protected.
Place a thick rug or cardboard sheets underneath the structure. This creates a protective barrier during the work.
Never tackle this job solo if the components feel too heavy. An unstable piece can shift suddenly and cause injury. Ask a friend for assistance to manage the weight safely.
Keep all loose screws and connectors in a sealed bag. This prevents them from getting lost underfoot. It also organizes parts for later reassembly.
Be aware of your surroundings in a confined area. Walls and other furniture can be easily bumped. Clear a wide path to move pieces freely.
| Precaution | Recommended Action | Primary Reason |
|---|---|---|
| Floor Protection | Lay down a rug or cardboard | Prevents scratches and dents on hardwood |
| Personal Safety | Get help with heavy pieces | Avoids strain and potential injury |
| Hardware Management | Store parts in a sealed bag | Eliminates tripping hazards and keeps items organized |
| Workspace Awareness | Clear ample space around the area | Prevents collisions with walls or other furniture |
Disassembling Bed Frame Components
Handling the long metal pieces and boxspring supports demands careful coordination. This phase begins after the main structure is loose and stable.
Your focus now shifts to the individual parts. A methodical approach here keeps everything organized and damage-free.
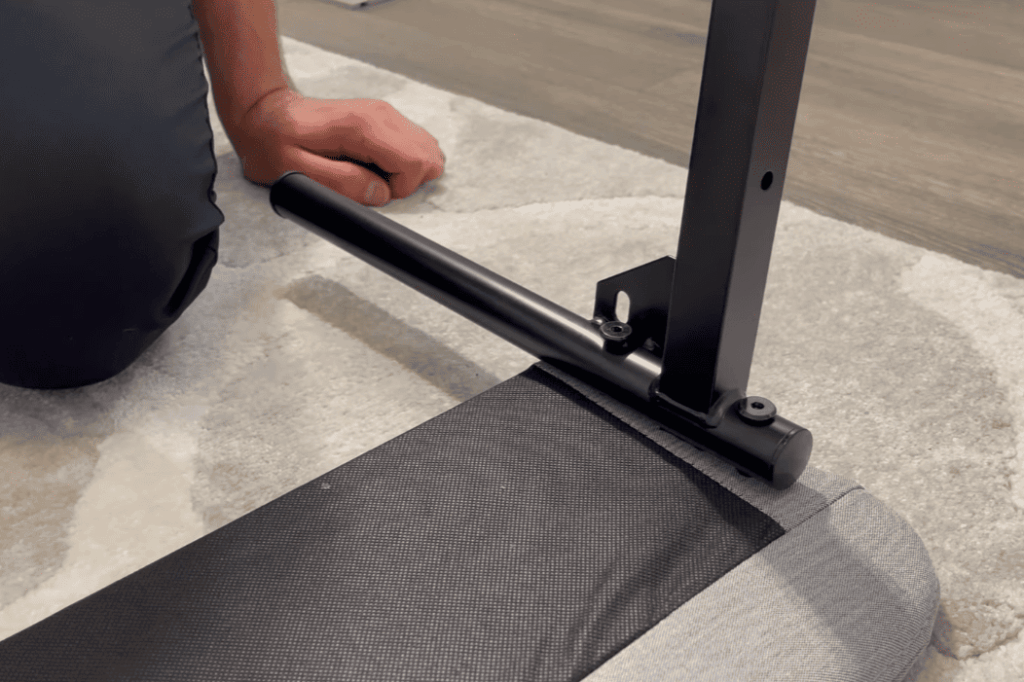
Removing the Metal Posts and Connectors
Carefully detach each metal post from the main frame. Store every post with its matching cam-lock fastener.
This pairing is crucial for a smooth rebuild later. Keep these sets together in a labeled bag.
Be gentle when pulling the posts free. Dropping them can scratch the wooden surfaces.
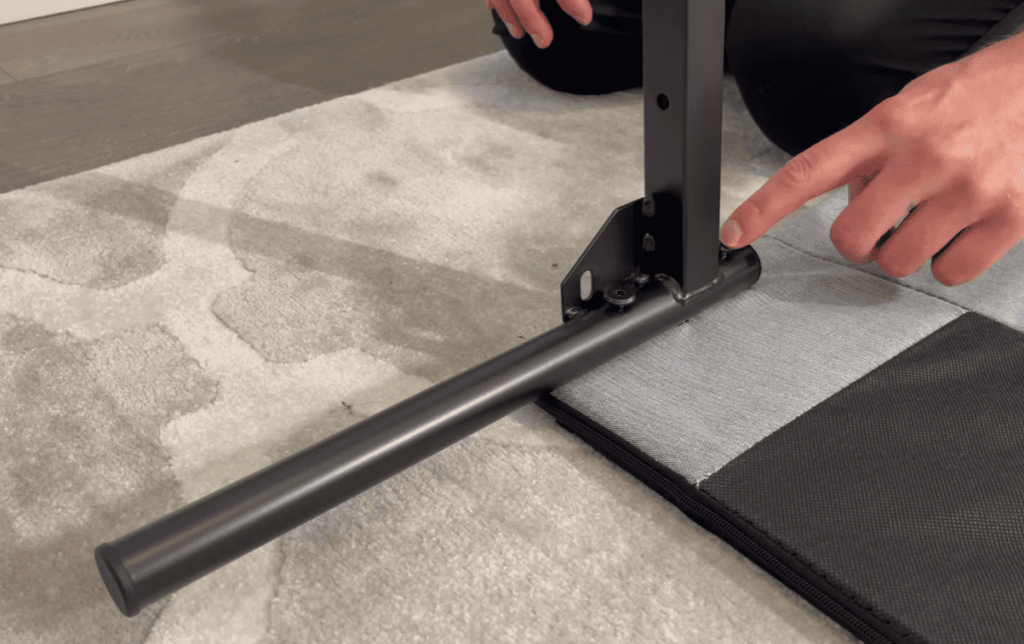
Taking Apart Boxspring Supports
These long metal slats require a partner. Have a friend hold them steady as you work.
As Protorp noted in 2020, repositioning the entire unit can provide better access.
Turning the bed on its end helps when trying to pull off the upper pieces.
This simple tilt makes reaching the connectors much easier. It’s a smart trick for tight spaces.
When you take apart these supports, maneuver them slowly. Their length makes them awkward.
Lay them flat on a protected surface immediately after removal. This prevents accidental bumps or falls.
Group all components by their original section as you go. This organization saves immense time during future assembly.
Addressing Common Challenges
A project that seems straightforward can quickly become complicated by aged components. The most frequent issue involves cam-locks that simply won’t budge.
This stubbornness often stems from years of weight and pressure. It can also result from a previous owner’s overly tight installation.
When standard methods fail, frustration mounts. As one user, Cthlsgnd, shared in May 2020, the impulse to give up can be strong.
Some users may feel the need to destroy the frame if it becomes impossible to disassemble.
Before reaching that extreme point, take a breath. Ask yourself a practical question.
Is salvaging this piece worth a major struggle? Sometimes, disposal is the more sensible and efficient path forward.
If you decide to continue, follow these tips to work smarter:
- Conduct a thorough search for any hidden screws. These can be tucked under the mattress platform or within support rails.
- Apply penetrating oil to frozen metal fittings. Let it soak in for several minutes before trying again.
- Keep in mind the original design purpose. This furniture is built for initial setup, not necessarily for endless cycles of breakdown and rebuild.
- Protect your floors and your back. Prying with excessive leverage can cause collateral damage.
Patience and a realistic assessment are your best tools here. Not every battle is worth winning, and knowing when to stop is a valuable skill.
Choosing Between DIY and Professional Help
Every furniture project reaches a crossroads where you must pick your path. Your choice hinges on your comfort with basic tools and the manual labor involved.
If you’re not a natural handyman, seeking help is a smart move. It prevents you from damaging your expensive bed or your apartment walls.
I looked at TaskRabbit, but the quotes were too high for my budget. Luckily, a neighbor offered to lend a hand for free.
This real-world example shows a great middle ground. Professional services are a solid investment if you’re short on time or worried about frustration.
They are especially valuable if the sleeping frame is particularly complex. Weigh the service cost against the time and stress you’ll save.
User Experiences and Expert Advice
When in doubt, the experiences of fellow DIYers offer practical solutions you won’t find in any tool kit. Leveraging this shared knowledge is a major advantage for anyone tackling a furniture project.
Insights from Community Forums
Online discussion boards are treasure troves of model-specific guidance. People who have successfully taken apart the same bed you own share their exact steps and warnings.
This crowd-sourced wisdom helps you sidestep common errors. For example, many learn the hard way about over-tightening cam-locks during setup.
As user Sacrifix noted, a visual guide can be crucial. “Watching an instructional video at the 2:20 mark is helpful for understanding the process,” they recommended on May 29, 2020.
Video Tutorials and Official Manuals
Sometimes, seeing a action makes everything click. A video demonstration clearly shows the “funky maneuver” needed for certain connectors.
For the most authoritative direction, always check the source. Soelo suggested on May 29, 2020, that checking the IKEA website for your specific model manual provides the manufacturer’s intended procedure.
Combining a visual tutorial with the official manual for your frame gives you the clearest possible path forward. It turns confusion into confidence.
Troubleshooting and Quick Fixes
A seized screw or a greasy cam-lock can turn a simple task into a frustrating puzzle. Before you resort to force, a few smart techniques can get things moving again.
Dealing with Grease and Stubborn Screws
Always verify your tools first. An incorrect allen wrench size is a common culprit. It can strip the head of a screw, making removal far harder.
Internal pressure often binds components. Ensure the entire structure is perfectly level and square. This simple adjustment relieves tension on stuck screws.
As an anonymous user wondered in 2020, can WD-40 or dish soap help? While lubricants are popular suggestions, correcting the frame’s alignment is often the better fix.
Effective Use of Degreasers and WD-40
If you choose a penetrant, apply it sparingly directly to the threads. These products can leave an oily residue on your bed‘s wood or metal parts.
Protect your flooring and the furniture finish. Degreasers may cause stains or damage if they drip onto surfaces.
For a fastener with a damaged head, specialized extraction tools are the next step. This careful approach prevents further harm to the material around it.
Conclusion
Completing this furniture project successfully comes down to preparation and patience. A clear grasp of the cam-lock system is your greatest asset.
Following practical advice, like that from the anonymous poster in May 2020, helps you sidestep common errors. Always ensure your structure is level and use the correct size allen wrench to avoid stripped screws.
If you find yourself truly stuck, don’t hesitate to ask a neighbor or consult the official manual. With a careful approach, you can safely take apart your sleeping structure.
Your bed will then be perfectly prepared for a move or sale. This process saves you money and stress for the future.